Connecting your smartphone to BUsecure
Bryan Gibson
Last Update setahun yang lalu
To connect your iPhone to BUsecure:
- From your home screen, tap on Settings > WiFi
- Make sure WiFi is toggled on, and a list of available networks will appear.
- Select BUsecure, then enter your BUnetID and Password to connect.
- The first time you connect a device to BUsecure, you will be presented with a security certificate for BUsecure. Tap on Trust in the upper right to continue.
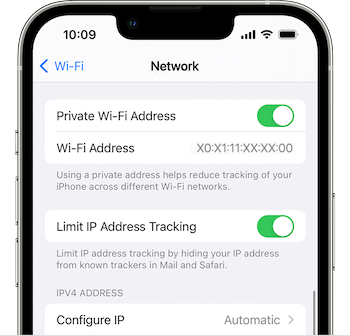
If you have trouble using RapidIdentity for MFA, or you encounter other connectivity issues, make the following configuration change to the BUsecure connection:
- Go back to Settings > WiFi
- Where it shows BUsecure as the connected wireless network, tap the information button (little blue circle with "i" in the middle).

3. Scroll down to Private Wi-Fi Address and toggle the option OFF.
4. Below that you will find the Limit IP Address Tracking setting. Toggle that option OFF.
If you have an Android Phone
Here is where things get a bit trickier due to the wide variety of phone makers and variations within the settings between them and the different flavors of Android.
- Open your phone's Settings app, then Network and Wi-Fi settings according to your phone manufacturer's instructions.
Once there, select BUsecure, and a configuration window will appear.
When the configuration window appears, enter the following information:
EAP method: PEAP
Phase 2 authentication: MSCHAPV2
CA certificate: Use System Certificates or Default.
Minimum TLS version: TLSv1.0
Online Certificate Status: Do not validate OR Do not use, etc.
Domain or Domain prefix: bradley.edu
Identity: your BUNetID
Anonymous Identity: your BUNetID*
Password: your Bradley password
*if you have difficulties connecting to the network, try leaving this section blankAfter configuring the connection, tap Connect, and the connection should establish properly.

